You Might Also Like

Showing posts with label Modules. Show all posts

Sunday, March 09, 2014

What browser am I using?

What browser am I using?
is fantastic web app that will make it easy to know what browser your client or anybody is using.
You're using Firefox 27.
Share this with your support team!


Browser details 
This information may help support representatives resolve any issues you're experiencing with their website.
Operating system Windows 7
Cookies enabled Yes
Flash version 12.0.0
Java version 1.7.0_09
Browser size 1349 x 664
Screen size 1366 x 768
Color depth 24 bit

Your full user agent string is: Mozilla/5.0 (Windows NT 6.1; WOW64; rv:27.0) Gecko/20100101 Firefox/27.0

Friday, September 20, 2013

Tutorial jQuery Fullscreen Editor


This jQuery plugin that adds a fullscreen mode option to a common text area.

Key features

  • Flexible fullscreen mode
  • Works on mobile - and major desktop browsers
  • Comes with two different transitions
  • Only ~4kb (minified)


Instructions

Download and extract the zip file to your desired project folder. Then in your document, first include fseditor.css right before >head< tag,
<link rel="stylesheet" href="fseditor.css" type="text/css" media="all">
Then include jQuery +1.8 and minimized version of fseditor's core javascript file;
<script src="//ajax.googleapis.com/ajax/libs/jquery/1.8.3/jquery.min.js"></script>
<script src="jquery.fseditor.min.js"></script>
<script>
  $(".mytextarea").fseditor();
</script>
That's it! Now the magic will happen.

Options

overlay Whether show semi-transparent overlay behind the editor in fullscreen mode. (true/false)
placeholder Show placeholder on the editor. (string)
transition The transition effect while switching fullscreen mode, by default it is 'fade'.
('fade', 'slide-in')
expandOnFocus When set to true, the fullscreen mode will be triggered on focus. (true/false)
maxWidth Maximum width for fullscreen editor. (number)
maxHeight Maximum height for fullscreen editor. (number)
onExpand Expand event will be triggered when editor the goes to fullscreen mode. (function)
onMinimize Minimize event will be triggered when the editor goes to inline mode. (function)

Public Methods

To trigger a public method of the plugin, you can simply call;
$('#fseditor').fseditor('method');
expand Triggers fullscreen mode.
minimize Minimize the fullscreen mode. (unless it's not expanded)
destroy Removes the plugin completely and brings the native textfield back.

Credits

This plugin was created by Burak Son (@burakson). Feel free to open a ticket on issue tracker regarding any ideas/bug report. Contribution would also be appreciated!

Sunday, September 15, 2013

Tutorial Add a Progress Bar to Your Site

DEMO          DOWNLOAD

Since the advent of mobile, web sites are turning more and more into “apps”. Concepts that make sense for a locally running application are transferred to the web. One of these is the recent addition of “progress bars” to some of Google’s websites that show the loading state of the page.
In this quick tip, we will use the new NProgress jQuery plugin to add a progress bar to a web page. If you’d like to learn more, keep reading!

The NProgress Plugin

NProgress is a jQuery plugin that shows an interactive progress bar on the top of your page, inspired by the one on YouTube. It consists of a global object – NProgress which holds a number of methods that you can call to advance the progress bar. Here is a quick demo of the methods:

<div>
    <h1>Quick Load</h1>
    <p>Show the progress bar quickly. This is useful for one-off tasks like AJAX requests and page loads.</p>
    <button class="quick-load">Quick Load</button>
</div>

<div>
    <h1>Incremental Load</h1>
    <p>The progress bar is incremented with every element that is loaded. This can be useful in web apps that load multiple items.</p>
    <button class="show-progress-bar">Show Progress Bar</button>
    <button class="load-one-item">Load An Item</button>
    <button class="finish">Finish Loading</button>
</div>

<div>
    <h1>Percentage Load</h1>
    <p>NProgress lets you set the progress bar to a specific percentage. This can be useful in apps where you know the total number of the items to be loaded, so you can calculate the percentage. This is the technique that we will use in the demo.</p>
    <button class="show-progress-bar">Show Progress Bar</button>
    <button class="set-to-25">Set to 25% Loaded</button>
    <button class="set-to-75">Set to 75% Loaded</button>
    <button class="finish">Finish Loading</button>
</div>

The plugin github page suggests that you hook up the NProgress.start() function to your $(document).ready() callback and NProgress.done() to $(window).load() which is a very easy way to integrate the plugin. This won’t show the real progress (for that you will have to monitor all the resources that are included in your page and increment the bar manually), however most people won’t notice anyway.
Now that you have a good idea of how NProgress is used, let’s make a more complicated example – a gallery that shows a progress bar while loading images. The bar will correspond to the actual number of images loaded.

The Gallery

As usual, we start off with the HTML markup. This time it is very simple, we only have need a div to hold the photos, and a load button:

index.html

<!DOCTYPE html>
<html>

    <head>
        <meta charset="utf-8"/>
        <title>Quick Tip: Add a Progress Bar to Your Site</title>

        <link href="http://fonts.googleapis.com/css?family=PT+Sans+Narrow:700" rel="stylesheet" />

        <!-- The Stylesheets -->
        <link href="assets/nprogress/nprogress.css" rel="stylesheet" />
        <link href="assets/css/style.css" rel="stylesheet" />

    </head>

    <body>

        <h1>Gallery Progress Bar</h1>

        <div id="main"></div>

        <a href="#" id="loadMore">Load More</a>

        <script src="http://cdnjs.cloudflare.com/ajax/libs/jquery/1.10.2/jquery.min.js"></script>
        <script src="assets/nprogress/nprogress.js"></script>
        <script src="assets/js/script.js"></script>

    </body>
</html>
I am including a custom font from Google Webfonts and two stylesheets in the <head>, and three JavaScript files before the closing </body> tag.

Things get more interesting in the jQuery part of the tutorial. Here I am using the Deferred object to show the photos consecutively. This is needed, because we want the photos to download in parallel (which is much faster), but fade into view one after the other. This article is too short to explain how Deferreds work, but you can read through one of these: link, link, link. They are a powerful tool that can simplify asynchronous interactions.

assets/js/script.js

(function($){

    // An array with photos to show on the page. Instead of hard 
    // coding it, you can fetch this array from your server with AJAX.

    var photos = [
        'assets/photos/1.jpg',	'assets/photos/2.jpg',
        'assets/photos/3.jpg',	'assets/photos/4.jpg',
        // more photos here
    ];

    $(document).ready(function(){		

        // Define some variables

        var page = 0,
            loaded = 0,
            perpage = 10,
            main = $('#main'),
            expected = perpage,
            loadMore = $('#loadMore');

        // Listen for the image-loaded custom event

        main.on('image-loaded', function(){

            // When such an event occurs, advance the progress bar

            loaded++;

            // NProgress.set takes a number between 0 and 1
            NProgress.set(loaded/expected);

            if(page*perpage >= photos.length){

                // If there are no more photos to show,
                // remove the load button from the page

                loadMore.remove();
            }
        });

        // When the load button is clicked, show 10 more images 
        // (controlled by the perpage variable)

        loadMore.click(function(e){

            e.preventDefault();

            loaded = 0;
            expected = 0;

            // We will pass a resolved deferred to the first image,
            // so that it is shown immediately.
            var deferred = $.Deferred().resolve();

            // Get a slice of the photos array, and show the photos. Depending
            // on the size of the array, there may be less than perpage photos shown

            $.each(photos.slice(page*perpage, page*perpage + perpage), function(){

                // Pass the deferred returned by each invocation of showImage to 
                // the next. This will make the images load one after the other:

                deferred = main.showImage(this, deferred);

                expected++;
            });

            // Start the progress bar animation
            NProgress.start();

            page++;
        });

        loadMore.click();
    });

    // Create a new jQuery plugin, which displays the image in the current element after
    // it has been loaded. The plugin takes two arguments:
    //	* src - the URL of an image
    //	* deferred - a jQuery deferred object, created by the previous call to showImage
    // 
    // Returns a new deferred object that is resolved when the image is loaded.

    $.fn.showImage = function(src, deferred){

        var elem = $(this);

        // The deferred that this function will return

        var result = $.Deferred();

        // Create the photo div, which will host the image

        var holder = $('<div class="photo" />').appendTo(elem);

        // Load the image in memory

        var img = $('<img>');

        img.load(function(){

            // The photo has been loaded! Use the .always() method of the deferred
            // to get notified when the previous image has been loaded. When this happens,
            // show the current one.

            deferred.always(function(){

                // Trigger a custom event on the #main div:
                elem.trigger('image-loaded');

                // Append the image to the page and reveal it with an animation

                img.hide().appendTo(holder).delay(100).fadeIn('fast', function(){

                    // Resolve the returned deferred. This will notifiy
                    // the next photo on the page and call its .always() callback

                    result.resolve()
                });
            });

        });

        img.attr('src', src);

        // Return the deferred (it has not been resolved at this point)
        return result;
    } 

})(jQuery);
The progress bar is incremented with every loaded image by the callback function that listens for the image-loaded custom event. This way the showImage function is free to handle only the loading and displaying of the photos.
by Martin Angelov
source: http://tutorialzine.com/2013/09/quick-tip-progress-bar/


Thursday, September 12, 2013

Tutorial AngularJS With These 5 Practical Examples


By now you’ve probably heard of AngularJS – the exciting open source framework, developed by Google, that changes the way you think about web apps. There has been much written about it, but I have yet to find something that is written for developers who prefer quick and practical examples. This changes today. Below you will find the basic building blocks of Angular apps - Models, Views, Controllers, Services and Filters - explained in 5 practical examples that you can edit directly in your browser. If you prefer to open them up in your favorite code editor, grab the zip above.

What is AngularJS?

On a high level, AngularJS is a framework that binds your HTML (views) to JavaScript objects (models). When your models change, the page updates automatically. The opposite is also true – a model, associated with a text field, is updated when the content of the field is changed. Angular handles all the glue code, so you don’t have to update HTML manually or listen for events, like you do with jQuery. As a matter of fact, none of the examples here even include jQuery!
To use AngularJS, you have to include it in your page before the closing <body> tag. Google’s CDN is recommended for a faster load time:
<script src="https://ajax.googleapis.com/ajax/libs/angularjs/1.0.7/angular.min.js"></script>
AngularJS gives you a large number of directives that let you associate HTML elements to models. They are attributes that start with ng- and can be added to any element. The most important attribute that you have to include in any page, if you wish to use Angular, is ng-app:
<body ng-app>
It should be added to an element that encloses the rest of the page, like the body element or an outermost div. Angular looks for it when the page loads and automatically evaluates all directives it sees on its child elements.
Enough with the theory! Now let’s see some code.

1. Navigation Menu

As a first example, we will build a navigation menu that highlights the selected entry. The example uses only Angular’s directives, and is the simplest app possible using the framework. Click the “Edit” button to see the source code. It is ready for experimentation!
In the code above, we are using Angular’s directives to set and read the active variable. When it changes, it causes the HTML that uses it to be updated automatically. In Angular’s terminology, this variable is called a model. It is available to all directives in the current scope, and can be accessed in your controllers (more on that in the next example).
If you have used JavaScript templates before, you are familiar with the {{var}} syntax. When the framework sees such a string, it replaces it with the contents of the variable. This operation is repeated every time var is changed.

2. Inline Editor

For the second example, we will create a simple inline editor – clicking a paragraph will show a tooltip with a text field. We will use a controller that will initialize the models and declare two methods for toggling the visibility of the tooltip. Controllers are regular JavaScript functions which are executed automatically by Angular, and which are associated with your page using the ng-controller directive.
When the controller function is executed, it gets the special $scope object as a parameter. Adding properties or functions to it makes them available to the view. Using the ng-model binding on the text field tells Angular to update that variable when the value of the field changes (this in turn re-renders the paragraph with the value).

3. Order Form

In this example, we will code an order form with a total price updated in real time, using another one of Angular’s useful features – filters. Filters let you modify models and can be chained together using the pipe character |. In the example below, I am using the currency filter, to turn a number into a properly formatted price, complete with a dollar sign and cents. You can easily make your own filters, as you will see in example #4.
The ng-repeat binding (docs) is another useful feature of the framework. It lets you loop through an array of items and generate markup for  them. It is intelligently updated when an item is changed or deleted.
Note: For a more complete version, see this tutorial, which is based on this one, written with Backbone.js.

4. Instant Search

This example will allow users to filter a list of items by typing into a text field. This is another place where Angular shines, and is the perfect use case for writing a custom filter. To do this though, we first have to turn our application into a module.
Modules are a way of organizing JavaScript applications into self-contained components that can be combined in new and interesting ways. Angular relies on this technique for code isolation and requires that your application follows it before you can create a filter. There are only two things that you need to do to turn your app into a module:
  1. Use the angular.module("name",[]) function call in your JS. This will instantiate and return a new module;
  2. Pass the name of the module as the value of the ng-app directive.
Creating a filter then is as simple as calling the filter() method on the module object returned by angular.module("name", []).
Filters follow the Angular.js philosophy – every piece of code that you write should be self-contained, testable and reusable. You can use this filter in all your views and even combine it with others through chaining.

5. Switchable Grid

Another popular UI interaction is switching between different layout modes (grid or list) with a click of a button. This is very easy to do in Angular. In addition, I will introduce another important concept – Services. They are objects that can be used by your application to communicate with a server, an API, or another data source. In our case, we will write a service that communicates with Instagram’s API and returns an array with the most popular photos at the moment.
Note that for this code to work, we will have to include one additional Angular.js file in the page:
<script src="http://ajax.googleapis.com/ajax/libs/angularjs/1.0.7/angular-resource.min.js"></script>
This includes the ngResource module for easily working with AJAX APIs (the module is exposed as the $resource variable in the code). This file is automatically included in the editor below.

Services are entirely self-contained, which makes it possible to write different implementations without affecting the rest of your code. For example, while testing, you might prefer to return a hard-coded array of photos which would speed up your tests.
more info:http://tutorialzine.com/2013/08/learn-angularjs-5-examples/



Saturday, August 03, 2013

Download: File Type Icons

File Type Icons by Web Icon Set is a great set of 62 stylish file extension icons in AI, ICO and PNG.

File Type Icons is a set of 62 different file extension icons in AI, ICO and PNG format. They are designed in long shadow flat design style, which looks very neat and modern. You can easily change the colors as well.

File Type Icons is free for download. You can see some of the most popular filename extensions like .png, .jpg, .exe, .dmg and .txt. If you need an icon that is not in the list, you can easily make or add one by yourself by modifying the AI source file. We will be adding more file types in the future.

File Type Icons come with AI, ICO and PNG format. They can be resized and can easily change colors. You can use the royalty-free icons for any personal, commercial project including web design, software, application, advertising, film, video, computer game, gui design, illustration.
source: http://www.webiconset.com/file-type-icons/

Thursday, July 18, 2013

Tabulous.js - jQuery Tabs Module

DEMO     -     DOWNLOAD

If you think that tabs are our of fashion and boring, think again and take a look at this stylish jQuery tabs module by Aaron Lumsden.

Documentation

..:: Getting Started

Include the relevant files
Firstly include jQuery and the tabulous.css and tabulous.js files. Place these before </head> section
<link href='tabulous.css' rel='stylesheet' type='text/css'>
<script type="text/javascript" src="http://ajax.googleapis.com/ajax/libs/jquery/1.7.2/jquery.min.js"></script>
<script type="text/javascript" src="tabulous.js"></script>
						
Create the tabs
<div id="tabs">
		<ul>
			<li><a href="#tabs-1" title="">Tab 1</a></li>
			<li><a href="#tabs-2" title="">Tab 2</a></li>
			<li><a href="#tabs-3" title="">Tab 3</a></li>
		</ul>

		<div id="tabs_container">
			

			<div id="tabs-1">
				<!--tab content-->
			</div>

			<div id="tabs-2">
				   <!--tab content-->
		
			</div>

			<div id="tabs-3">
				    <!--tab content-->
			</div>

		</div><!--End tabs container-->
		
	</div><!--End tabs-->

						
Initiate the plugin
Once you have created your tabs you will need to initiate the plugin.
At its most basic level you can initiate the plugin like:
$(document).ready(function ($) {

    $('#tabs').tabulous({);	

});
						
If you want to initiate the plugin with an effect then you can do so like:
$('#tabs').tabulous({
    	effect: 'scale'
    });			

..:: Options

Variable Default Value Description Valid Options
effect scale The effect to use for the transition scale / slideLeft / scaleUp / flip


Souece: http://git.aaronlumsden.com/tabulous.js/

Sunday, April 07, 2013

Tutorial: 3D-ifying Documents Using CSS Transforms


Cameron Lakenen from Crocodoc explains how they use SVG to do some fancy 3D effects when converting documents.

Note: the demos in this blog post require IE 9+ (preferably 10), Firefox, or any WebKit browser. If you’re on a mobile device, you might need to click the open in new page button to view the demos properly.


Padlet: Create Anything on a Blank "Wall" and Share


Padlet give you a blank wall. You put anything you want on it, anywhere. Simple, yet powerful.

you can create anything on a blank "wall" and share it with others.

checkout examples of Padlet used for
teaching, wishing friends, noticeboards, bookmarking, discussions, brainstorming, notetaking, quizzes, planning events, making lists, watching videos, collecting feedback

Friday, December 14, 2012

Tutorial Mini Help System with jQuery

DEMO      -      DOWNLOAD


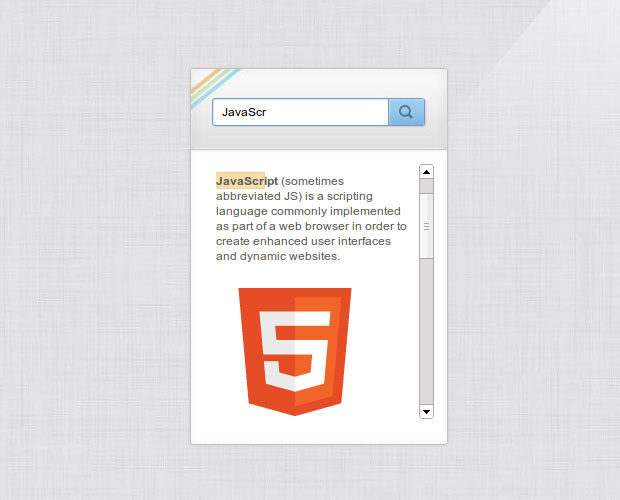
In this tutorial are going to create a mini help system with jQuery. This will be a small widget which will display help text or a guide to users of your web application. The widget content is going to be searchable in real time, and all matching terms will be highlighted.

For this example to work, here is what we have to do:
  • We have to listen for the input event on the text box. I prefer this to keypress, as input catches events like cut/paste and undo/redo. It is not supported in older browsers (<IE9) though, so you might want to replace it with keypress if you want this example to work there;
  • We will write a jQuery plugin, aptly named “highlight”, that will replace the matched text with <span> elements;
  • We will use the jQuery.scrollTo plugin to smoothly scroll the <span> elements into view.
Let’s start with the markup.
The first step is to lay down the HTML of the page that we will be working on:

<!DOCTYPE html>
<html>
    <head>
        <meta charset="utf-8" />
        <title>Mini Help System with jQuery | Tutorialzine </title>

        <!-- Our stylesheet -->
        <link rel="stylesheet" href="assets/css/styles.css" />

    </head>
    <body>

        <div id="widget">

            <div id="header">
                <input type="text" id="search" placeholder="Search in the text" />
            </div>

            <div id="content">
                <!-- Your help text goes here -->
            </div>
        </div>​​

        <!-- JavaScript Includes -->
        <script src="http://code.jquery.com/jquery-1.8.3.min.js"></script>
        <script src="assets/js/highlight.jquery.js"></script>
        <script src="assets/js/jquery.scrollTo.min.js"></script>
        <script src="assets/js/script.js"></script>
    </body>
</html>
 
 
There’s nothing out of the ordinary here – we are including a stylesheet in the head (you might want to take a look at it yourself, I won’t present it in this tutorial), jQuery and the scrollTo plugin at the bottom, along with two more js files that we will be discussing next. The widget has a text field (inside a #header div) and the #content holder. Inside the latter, you should put the help guide for your application.

The jQuery Code

Now we’re going to write a jQuery plugin that searches for specific words in the #content element, and replaces the occurrences with span elements. For example searching for javascript in the text javascript is awesome would yield <span class="match">javascript</span> is awesome. We will later style the .match spans with an orange background so they are easily distinguishable.
The plugin will take two arguments – a search term (as a string), and an optional callback function that will be executed when the search/replace process is complete. As you will see later, we will use the callback to hook the scrollTo plugin and scroll the #content div to reveal the matches.

Before you start reading this code, keep in mind that you can’t simply fetch the inner html of the div, and call replace() on it to replace the search occurrences with span elements, as this way you will break your markup. If someone entered “div” as a search term this would cause all your <div> elements to be replaced with <<span class="match">div</span>>, witch is just asking for trouble.
The solution is a bit more complex (but not difficult once you get the idea) – we will use the contents() jQuery method to fetch all children of the element, and replace() the text only on the text nodes (they are guaranteed to not contain any html). We will then loop through all the element’s non-textnode children recursively, and repeat the steps.

assets/js/hight.jquery.js

(function($) {

    var termPattern;

    $.fn.highlight = function(term, callback) {

        return this.each(function() {

            var elem = $(this);

            if (!elem.data('highlight-original')) {

                // Save the original element content
                elem.data('highlight-original', elem.html());

            } else {

                // restore the original content
                elem.highlightRestore();

            }

            termPattern = new RegExp('(' + term + ')', 'ig');

            // Search the element's contents
            walk(elem);

            // Trigger the callback
            callback && callback(elem.find('.match'));

        });
    };

    $.fn.highlightRestore = function() {

        return this.each(function() {
            var elem = $(this);
            elem.html(elem.data('highlight-original'));
        });

    };

    function walk(elem) {

        elem.contents().each(function() {

            if (this.nodeType == 3) { // text node

                if (termPattern.test(this.nodeValue)) {
                    // wrap the match in a span:
                    $(this).replaceWith(this.nodeValue.replace(termPattern, '<span class="match">$1</span>'));
                }
            } else {
                // recursively call the function on this element
                walk($(this));
            }
        });
    }

})(jQuery);


And voila, our text is full with pretty highlights! Don’t worry if you don’t quite understand how this works – it is packaged as an easy to use jQuery plugin, so you can drop it in your project without much thought.

 Here is how to use the plugin:

assets/js/script.js

$(function() {

    var search = $('#search'),
        content = $('#content'),
        matches = $(), index = 0;

    // Listen for the text input event
    search.on('input', function(e) {

        // Only search for strings 2 characters or more
        if (search.val().length >= 2) {

            // Use the highlight plugin
            content.highlight(search.val(), function(found) {

                matches = found;

                if(matches.length && content.is(':not(:animated)')){
                    scroll(0);
                }

            });
        } else {
            content.highlightRestore();
        }

    });

    search.on('keypress', function(e) {

        if(e.keyCode == 13){ // The enter key
            scrollNext();
        }

    });

    function scroll(i){
        index = i;

        // Trigger the scrollTo plugin. Limit it
        // to the y axis (vertical scroll only)
        content.scrollTo(matches.eq(i), 800, { axis:'y' } );
    }

    function scrollNext(){
        matches.length && scroll( (index + 1) % matches.length );
    }
});


In the callback, I trigger the scroll(0) function. This animates the #content div so it shows the first match of the series. There is another function for scrolling – scrollNext, which is called when you hit the return key while typing. This will cause the holder to reveal the next match. With this our mini help system is complete!

by Martin Angelov
source : http://tutorialzine.com/2012/12/mini-help-system-jquery/ 

Friday, November 30, 2012

Tutorial: Dropbox File Uploader With Twitter Bootstrap

DEMO     -     DOWNLOAD     -      SOURCE

A few weeks ago, Dropbox introduced a neat new feature – the Dropbox Chooser. By embedding it into your website, you give users a button with which they can attach files from their online storage.

Today we are going to use this feature to create a simple application that allows people to attach a photo from their Dropbox account, crop an area with the Jcrop plugin, and download the result. Additionally, we will make use of Twitter Bootstrap to show dialog windows, and PHP on the backend for the actual photo cropping.

Saturday, November 10, 2012

Tutorial Colorful CSS3 Animated Navigation Menu

DEMO     -     DOWNLOAD     -     SOURCE

In this short tutorial, we will be creating a colorful dropdown menu using only CSS3 and the Font Awesome icon font. An icon font is, as the name implies, a font which maps characters to icons instead of letters. This means that you get pretty vector icons in every browser which supports HTML5 custom fonts (which is practically all of them). To add icons to elements, you only need to assign a class name and the icon will be added with a :before element by the font awesome stylesheet.

Sunday, October 07, 2012

Tutorial Todo List App Powered By WordPress


In this tutorial, we are going to make a WordPress plugin that hooks into the API. It will then present a simple, AJAX-ed todo list application on the /todo URL of your WordPress site. The best thing is that this is a plugin and not a theme, which means you can use it on any WordPress site regardless of the theme. Let’s get started!

Your First WordPress Plugin

If you haven’t written a WordPress plugin before, here is what you need to know:
  • Plugins are PHP files that reside in the /wp-content/plugins folder;
  • Plugins can be either a single PHP file with a unique name, or a folder with that file inside it, along with additional includes and resources (read the getting started guide);
  • Plugins are described by a comment header in the main PHP file. You need this for your plugin to be recognized;
  • Plugins do their business by hooking up to specific events in the WordPress execution. There is a reference with all available filters and actions;
  • The documentation is your friend.
To develop a plugin, install a local copy of WordPress and create a new PHP file in the /wp-content/plugins folder. After this place the header comment you see below, and activate your plugin from the admin panel.
If you only wish to test out the Todo app we are writing today, you can simply grab the download zip, and install it from WordPress’ admin panel (choose Plugins->Upload).

Monday, August 27, 2012

Tutorial Make a Drawing Game with Node.js

DEMO     -     DOWNLOAD     -     SOURCE

By now you have probably heard of node.js. It is an asynchronous web server built ontop of Google’s V8 JavaScript engine (the same one that makes Chrome lighning fast). Using node, you can write scalable web services in JavaScript, that can handle a huge number of simultaneous connections, which makes it perfect as the backend of games, web chats and other real time tasks.

The Idea 

Today we will be making a simple online drawing game. The app will let users draw on the page by dragging and moving their mice, and will display the results on a large canvas element. What sets is apart from all the other similar experiments though, is that people will see each other in real time as they do so. To achieve this, we will leverage the socket.io

library for node.js, which uses a range of technologies from websockets to AJAX long polling to give us a real time data channel. Because of this, the example works in all modern browsers.

Installing node.js

To run the game you will need to install node.js. It shouldn’t take more than a few minutes and is fairly straightforward. If you are on Windows, you can go ahead and download the installer from its official site. If you are on Linux or OSX, you will need to run this set of commands in your terminal (you only need to run the first script: node-and-npm-in-30-seconds.sh).
After you finish installing, you will also get access to npm, or node package manager. With this utility you can install useful libraries and bits of code that you can import into your node.js scripts. For this example, we will need the socket.io library I mentioned above, and node-static, which will serve the HTML, CSS and JS files of the drawing application. Again, open up your terminal (or a new command prompt window if you are on Windows) and write the following command:
1npm install socket.io node-static
This shouldn’t take more than a few minutes to complete.

Running the Application

If you want to just grab the files and test the app on your computer, you will need to download the archive from the button above, and extract it somewhere on your hard drive. After this, open a command prompt / terminal and navigate to the folder (of course you remember how the cd command works, don’t you?). After this, type this command and hit return:
1node app.js
You should be greeted with a socket.io debug message (otherwise probably your path is wrong; keep practicing with that cd command!). This means that everything is up and running! Now open http://localhost:8080 and you should see your very own copy of the demo. Nice!
These instructions also apply if you are following the steps of the article and are building the app from scratch. Which brings us back to the tutorial:

The HTML

The first step is to create a new HTML document. Inside it, we will put the canvas element which users will be drawing upon, and a div for holding the mouse pointers. Each mouse pointer will be a div with the .pointer css class that is absolutely positioned on the page (we won’t be discussing the styling in this article, open assets/css/styles.css to take a look).

index.html


01<!DOCTYPE html>
02<html>
03    <head>
04        <meta charset="utf-8" />
05        <title>Node.js Multiplayer Drawing Game | Tutorialzine Demo</title>
06
07        <!-- The stylesheets -->
08        <link rel="stylesheet" href="assets/css/styles.css" />
09
10        <!--[if lt IE 9]>
11          <script src="http://html5shiv.googlecode.com/svn/trunk/html5.js"></script>
12        <![endif]-->
13    </head>
14
15    <body>
16        <div id="cursors">
17            <!-- The mouse pointers will be created here -->
18        </div>
19
20        <canvas id="paper" width="1900" height="1000">
21            Your browser needs to support canvas for this to work!
22        </canvas>
23
24        <hgroup id="instructions">
25            <h1>Draw anywhere!</h1>
26            <h2>You will see everyone else who's doing the same.</h2>
27            <h3>Tip: if the stage gets dirty, simply reload the page</h3>
28        </hgroup>
29
30        <!-- JavaScript includes. Notice that socket.io.js is served by node.js -->
31        <script src="/socket.io/socket.io.js"></script>
32        <script src="http://code.jquery.com/jquery-1.8.0.min.js"></script>
33        <script src="assets/js/script.js"></script>
34
35    </body>
36</html>

You can see that the canvas is set to a fixed width of 1900px and height of 1000px, but users with smaller displays will see only a part of it. A possible enhancement would be to enlarge or reduce the canvas in relation to the screen size, but I will leave that to you.
For the real-time communication channel between the users’s browser and node.js to work, we need to include the socket.io library in both places, however you won’t find the socket.io.js file included in the bottom of index.html in the download archive. This is because socket.io intercepts requests to /socket.io/socket.io.js and serves it itself so you don’t have to explicitly upload this file with your application.

Draw Anywhere!

Draw Anywhere!

The Client Side

In other tutorials, we would usually name this section JavaScript, but this time we have JavaScript on both the client (the person’s browser) and the server (node.js), so proper distinction must be made.
The code you see below runs in the person’s browser. It uses socket.io to connect to the server and notifies us when an event occurs. That event is a message emitted by other clients and relayed back to us by node.js. The messages contain mouse coordinates, unique id for the user, and whether they are drawing or not in the moment.

assets/js/script.js


001$(function(){
002
003    // This demo depends on the canvas element
004    if(!('getContext' in document.createElement('canvas'))){
005        alert('Sorry, it looks like your browser does not support canvas!');
006        return false;
007    }
008
009    // The URL of your web server (the port is set in app.js)
010    var url = 'http://localhost:8080';
011
012    var doc = $(document),
013        win = $(window),
014        canvas = $('#paper'),
015        ctx = canvas[0].getContext('2d'),
016        instructions = $('#instructions');
017
018    // Generate an unique ID
019    var id = Math.round($.now()*Math.random());
020
021    // A flag for drawing activity
022    var drawing = false;
023
024    var clients = {};
025    var cursors = {};
026
027    var socket = io.connect(url);
028
029    socket.on('moving', function (data) {
030
031        if(! (data.id in clients)){
032            // a new user has come online. create a cursor for them
033            cursors[data.id] = $('<div class="cursor">').appendTo('#cursors');
034        }
035
036        // Move the mouse pointer
037        cursors[data.id].css({
038            'left' : data.x,
039            'top' : data.y
040        });
041
042        // Is the user drawing?
043        if(data.drawing && clients[data.id]){
044
045            // Draw a line on the canvas. clients[data.id] holds
046            // the previous position of this user's mouse pointer
047
048            drawLine(clients[data.id].x, clients[data.id].y, data.x, data.y);
049        }
050
051        // Saving the current client state
052        clients[data.id] = data;
053        clients[data.id].updated = $.now();
054    });
055
056    var prev = {};
057
058    canvas.on('mousedown',function(e){
059        e.preventDefault();
060        drawing = true;
061        prev.x = e.pageX;
062        prev.y = e.pageY;
063
064        // Hide the instructions
065        instructions.fadeOut();
066    });
067
068    doc.bind('mouseup mouseleave',function(){
069        drawing = false;
070    });
071
072    var lastEmit = $.now();
073
074    doc.on('mousemove',function(e){
075        if($.now() - lastEmit > 30){
076            socket.emit('mousemove',{
077                'x': e.pageX,
078                'y': e.pageY,
079                'drawing': drawing,
080                'id': id
081            });
082            lastEmit = $.now();
083        }
084
085        // Draw a line for the current user's movement, as it is
086        // not received in the socket.on('moving') event above
087
088        if(drawing){
089
090            drawLine(prev.x, prev.y, e.pageX, e.pageY);
091
092            prev.x = e.pageX;
093            prev.y = e.pageY;
094        }
095    });
096
097    // Remove inactive clients after 10 seconds of inactivity
098    setInterval(function(){
099
100        for(ident in clients){
101            if($.now() - clients[ident].updated > fefbfb){
102
103                // Last update was more than 10 seconds ago.
104                // This user has probably closed the page
105
106                cursors[ident].remove();
107                delete clients[ident];
108                delete cursors[ident];
109            }
110        }
111
112    },fefbfb);
113
114    function drawLine(fromx, fromy, tox, toy){
115        ctx.moveTo(fromx, fromy);
116        ctx.lineTo(tox, toy);
117        ctx.stroke();
118    }
119
120});

The basic idea is that we use socket.emit() to send a message to the node.js server on every mouse movement. This can generate a large number of packets, so we are rate-limiting it to one packet every 30 ms (the $.now() function is defined by jQuery and returns the number of milliseconds since the epoch).
The mousemove event is not called on every pixel of the movement, but we are using a trick to draw solid lines instead of separate dots – when drawing on the canvas, we are using the lineTo method, so that the distance between the mouse coordinates are joined with a straight line.
Now let’s take a look at the server!

Server Side

After reading through the client side code you might be worried that the code on the server is even longer. But you will be mistaken. The code on the server side is much shorter and simpler. What it does is serve files when people access the url of the app in their browsers, and relay socket.io messages. Both of these tasks are aided by libraries so are as simple as possible.

app.js

01// Including libraries
02
03var app = require('http').createServer(handler),
04    io = require('socket.io').listen(app),
05    static = require('node-static'); // for serving files
06
07// This will make all the files in the current folder
08// accessible from the web
09var fileServer = new static.Server('./');
10
11// This is the port for our web server.
12// you will need to go to http://localhost:8080 to see it
13app.listen(8080);
14
15// If the URL of the socket server is opened in a browser
16function handler (request, response) {
17
18    request.addListener('end', function () {
19        fileServer.serve(request, response); // this will return the correct file
20    });
21}
22
23// Delete this row if you want to see debug messages
24io.set('log level', 1);
25
26// Listen for incoming connections from clients
27io.sockets.on('connection', function (socket) {
28
29    // Start listening for mouse move events
30    socket.on('mousemove', function (data) {
31
32        // This line sends the event (broadcasts it)
33        // to everyone except the originating client.
34        socket.broadcast.emit('moving', data);
35    });
36});

With this our drawing app is complete!

Advertisements

Advertisements