What browser am I using?
is fantastic web app that will make it easy to know what browser your client or anybody is using.
You're using Firefox 27.
Share this with your support team!
Browser details
This information may help support representatives resolve any issues you're experiencing with their website.
Operating system
Windows 7
Cookies enabled
Yes
Flash version
12.0.0
Java version
1.7.0_09
Browser size
1349 x 664
Screen size
1366 x 768
Color depth
24 bit
Your full user agent string is:
Mozilla/5.0 (Windows NT 6.1; WOW64; rv:27.0) Gecko/20100101 Firefox/27.0
If you need some pixel-perfect, round and flat icons for your next
project, you'll definitely find RoundIcons interesting. You can download
a set of 60 icon for a tweet or a like.
Free flat round icons set – 60 icons
Get a taste and check out these free icons from our premium bundle
Ionic offers a library of mobile-optimized HTML, CSS and JS
components for building highly interactive apps. It is built with Sass
and optimized for AngularJS. It's in alpha and it looks like a very
promising framework for developing hybrid mobile apps in HTML5.
A great set of 90 flat round icons in two variations by Elegant Themes. The icons come in two versions: full color and single color, for a total
of 180 variations. This download includes .ai, .eps, .pdf, and .png
(64px and 128px). Below is the full set in both styles. These icons are
completely free and Open Source under the GPL,
so feel free to use them in your personal and commercial projects
alike. We are on a mission to create the best collection of Open Source
graphics on the web, so that the WordPress ecosystem can use and enjoy
them alongside the freedoms they have become accustomed to.
This is a great tutorial by Nick Pettit on how to create an interactive 3D graphic with three.js.
In this step-by-step guide, we’re going to create a 3D version of the
Treehouse logo using three.js, which is a 3D graphics framework built on
top of WebGL. Click and drag your mouse to orbit the camera! You can
also use your mousewheel to zoom in and out.
3D graphics can be difficult, especially 3D in the browser. Frameworks like three.js make
it a bit easier, but the official documentation is still under
construction and there are a few quirks that can stop beginners from
ever getting started. If you’re new to 3D, this guide will help you get
started.
Even though three.js might look complex at first, it would actually take even more
code to write the same thing in pure WebGL, mostly because we’d need to
write a rendering engine. All the heavy lifting is done with three.js
without sacrificing much flexibility.
Browser Compatibility
For this tutorial, you’ll need the desktop version of either Chrome,
Firefox, or Safari. Unfortunately, WebGL doesn’t work on mobile browsers
yet, and it won’t be available in Internet Explorer until version 11.
Also, if you’re using Safari, you need to enable WebGL first. Here’s how to enable WebGL in Safari:
Open the Preferences menu.
Click on the Advanced tab.
Click the checkbox that says Show Develop menu in menu bar.
Open the Develop menu from the menu bar and select Enable WebGL.
Head over to http://threejs.org/ and click the “Download” link on the left side of your screen. Once the zip has finished downloading, open it up and go to the build folder. Inside, you’ll find a file called three.min.js and, if you’re following along, you should copy this file into your local development directory.
For this tutorial, you’ll also need a file called OrbitControls.js which is included in the three.js download. Here’s the file path: threejs folder > examples > js > controls > OrbitControls.js
If you’d rather just grab the two files you need, they’re included with the example code for this tutorial.
setup the local environment
JavaScript has a security feature called the same-origin policy,
which means you cannot load externally hosted files inside of your
JavaScript code. This can be slightly problematic, because three.js
needs to load geometry, textures, and other files. In order to
circumvent this issue, you’ll need a local http server so that your
files come from the same origin. Simply opening the index.html file
directly in the browser isn’t going to work.
Fortunately, there’s a three.js FAQ with an excellent guide on how to run three.js locally
using either Python, Ruby, or adjusting your browser settings. It’s
easier than it sounds, so if you’re scratching your head wondering why
some files aren’t loading, check out the guide.
CreatE 3D Assets
I’ve already created a 3D version of the Treehouse logo that you’re
welcome to use for learning purposes (you can find the mesh inside the code download), but if you’d like to create your own meshes, I recommend you use Blender.
It’s a wonderful 3D modeling and rendering package that’s free, open
source, and cross-platform. There’s also plenty of educational material
out there (free and paid) to help you get started modeling. I used
Blender for the first time and had my finished mesh in about an hour.
There’s probably some optimizations I could have made (the mesh topology
is actually a bit messy) but it works for this demo.
In order to export a mesh from Blender for use in three.js, you’ll
need to open the utility folder in three.js and install the exporter.
Here are instructions on how to export from Blender to three.js.
The HTML
Alright. Once you’ve got your files in place and your local
environment setup, it’s time to start coding. Let’s get the HTML out of
the way first, because that’s the easy part. You just need a basic
template like this to get going. This also assumes your JavaScript is
stored in a folder called js, so check your file paths just in case.
index.html
<!doctype html>
<html lang="en">
<head>
  <title>Treehouse Logo in three.js</title>
  <meta charset="utf-8">
</head>
<body style="margin: 0;">

  <script src="js/three.min.js"></script>
  <script src="js/OrbitControls.js"></script>

  <script>

    // Our 3D code will go here...

  </script>

</body>
</html>
Like I said, nothing special here. The magic happens between the script tags.
Using three.js to Create 3D Scenes
We could write our JavaScript externally, but since there aren’t any
HTML elements inside of the body, I figured it would help make this
example a bit more clear if inline script tags were used.
Global variables and functions
Inside our script tags, we want to set up some global variables and
then call some functions, all of which will be defined later on:
// Set up the scene, camera, and renderer as global variables.var scene, camera, renderer;
init();
animate();
Create the Scene
Three.js uses the concept of a scene to define an area where
you can place things like geometry, lights, cameras, and so on. In the
following code, we start writing our initialization function by creating
a scene. Then, we store the width and height of the browser window in
the variables WIDTH and HEIGHT. We’ll need them in more than once place later on, so it’s good to just grab them once and store them.
// Globals from the previous step go here...// Sets up the scene.function init(){// Create the scene and set the scene size.
scene =new THREE.Scene();var WIDTH = window.innerWidth,
HEIGHT = window.innerHeight;// More code goes here next...}
Create the Renderer
Next, we set up a three.js renderer. We could use the SVG or canvas renderers, but we want to use the WebGL renderer
because it’s able to take advantage of the GPU, which makes it several
orders of magnitude more performant. After creating the renderer, we
append it to the DOM via the body element. This will make three.js
create a canvas inside the body element that will be used to render our scene.
// Sets up the scene.function init(){// Code from previous steps goes here...// Create a renderer and add it to the DOM.
renderer =new THREE.WebGLRenderer({antialias:true});
renderer.setSize(WIDTH, HEIGHT);
document.body.appendChild(renderer.domElement);// More code goes here next...}
Create a Camera
Once our scene and renderer are in place, we can create a camera. The PerspectiveCamera takes a few parameters. They are:
FOV – We’re using 45 degrees for our field of view.
Apsect – We’re simply dividing the browser width and height to get an aspect ratio.
Near – This is the distance at which the camera will start rendering scene objects.
Far – Anything beyond this distance will not be rendered. Perhaps more commonly known as the draw distance.
After our camera is created, we set the position by using some simply XYZ coordinates. The default is 0,0,0 but I’ve set the Y value to 6 just to get some distance between our view and the mesh.
Finally, we need to add the camera to the scene.
// Sets up the scene.function init(){// Code from previous steps goes here...// Create a camera, zoom it out from the model a bit, and add it to the scene.
camera =new THREE.PerspectiveCamera(45, WIDTH / HEIGHT,0.1,20000);
camera.position.set(0,6,0);
scene.add(camera);// More code goes here next...}
Update the Viewport on Resize
This is all well and good, but what happens when the site visitor
resizes the browser window? For that, we’ll need to add an event
listener. When the browser is resized, a couple of things happen. First,
we resample the new width and height of the browser and store it in a
variable that’s scoped to the function. Then, we use those values to set
the new size of our renderer as well as recalculate the aspect ratio of
the camera. In addition, we need to call updateProjectionMatrix()
on the camera object so that our scene will actually update with the
new parameters. This is computationally expensive in the context of
real-time 3D rendering, but once the browser is resized, things click
back to their normal frame rates.
// Sets up the scene.function init(){// Code from previous steps goes here...// Create an event listener that resizes the renderer with the browser window.
window.addEventListener('resize',function(){var WIDTH = window.innerWidth,
HEIGHT = window.innerHeight;
renderer.setSize(WIDTH, HEIGHT);
camera.aspect= WIDTH / HEIGHT;
camera.updateProjectionMatrix();});// More code goes here next...}
Add Lighting
Now it’s time to start crafting our scene a bit. By calling the setClearColorHex function on our WebGLRenderer object, we’re able to set the background color of our scene to the Treehouse grey hex color with an opacity of 1.
Next, we’ll need a light in order to see our 3D objects, so we’ll add a PointLight
to the scene and set its position. There are several other kinds of
lights you can add to a scene, so be sure to check out the linked
documentation.
// Sets up the scene.function init(){// Code from previous steps goes here...// Set the background color of the scene.
renderer.setClearColorHex(0x333F47,1);// Create a light, set its position, and add it to the scene.var light =new THREE.PointLight(0xffffff);
light.position.set(-100,200,100);
scene.add(light);// More code goes here next...}
Load Geometry
Our mesh has been exported from Blender using the three.js JSON exporter, so we need to use the JSONLoader
to get the geometry into the scene. A callback is used inside the
loader to set the material on the mesh. In this case, we’re using a
basic LambertMaterial
to set the mesh to Treehouse’s green color. For completeness, I should
note here that the green you’re seeing in the final render isn’t quite
the same as Treehouse’s logo green. That’s because the point light is
skewing the brightness slightly, but we won’t worry about it for this
demo.
Before leaving the callback function, we create a new mesh with our
geometry and the material as parameters, then we add the mesh to the
scene.
// Sets up the scene.function init(){// Code from previous steps goes here...// Load in the mesh and add it to the scene.var loader =new THREE.JSONLoader();
loader.load("models/treehouse_logo.js",function(geometry){var material =new THREE.MeshLambertMaterial({color: 0x55B663});
mesh =new THREE.Mesh(geometry, material);
scene.add(mesh);});// More code goes here next...}
Add Controls
The last thing in our initialization function is the orbit controls
we included earlier. These aren’t totally necessary, but they do allow
us to drag the mouse across the mesh and orbit around it. It also allows
the mousewheel to be used to zoom in and out of the mesh.
// Sets up the scene.function init(){// Code from previous steps goes here...// Add OrbitControls so that we can pan around with the mouse.
controls =new THREE.OrbitControls(camera, renderer.domElement);}// More code goes here next...
Render the Scene
After our initialization function, we need to finish up with our
animation function. It may not seem like anything is really “animated”
here in the traditional sense, but we do need to redraw when the camera
orbits around the mesh.
The requestAnimationFrame() function uses a newer
browser API that delegates redraws to the browser. This has some pretty
cool benefits, but primarily it makes sure the browser isn’t drawing
your animation unnecessarily if that tab isn’t currently selected. Paul Irish wrote an excellent blog post on requestAnimationFrame that explains this in more detail.
After that, we need to render our scene through the camera we added earlier and then update the orbit controls.
// Sets up the scene.function init(){// Code from previous steps goes here...}// Renders the scene and updates the render as needed.function animate(){// Read more about requestAnimationFrame at http://www.paulirish.com/2011/requestanimationframe-for-smart-animating/
requestAnimationFrame(animate);// Render the scene.
renderer.render(scene, camera);
controls.update();}
Download E-Commerce Icon Set (33 Icons, PNG, PS, AI).
The icons are ideally suited to e-commerce projects and include many popular payment providers, including Bitcoin.
The icons come in different-sized PNGs (32 × 32, 64 × 64, 128 × 128
and 256 × 256 pixels), and the set includes Photoshop and Illustrator
files containing all of the icons. Released under the Creative Commons
Attribution-ShareAlike 3.0 Unported license, freely available for
private and commercial projects.
source: http://www.smashingmagazine.com/2013/09/13/freebie-e-commerce-icons-33-png-ps-ai/
Since the advent of mobile, web sites are turning more and more into
“apps”. Concepts that make sense for a locally running application are
transferred to the web. One of these is the recent addition of “progress
bars” to some of Google’s websites that show the loading state of the
page.
In this quick tip, we will use the new NProgress jQuery plugin to add
a progress bar to a web page. If you’d like to learn more, keep
reading!
The NProgress Plugin
NProgress
is a jQuery plugin that shows an interactive progress bar on the top of
your page, inspired by the one on YouTube. It consists of a global
object – NProgress which holds a number of methods that you can call to advance the progress bar. Here is a quick demo of the methods:
<div>
<h1>Quick Load</h1>
<p>Show the progress bar quickly. This is useful for one-off tasks like AJAX requests and page loads.</p>
<button class="quick-load">Quick Load</button>
</div>
<div>
<h1>Incremental Load</h1>
<p>The progress bar is incremented with every element that is loaded. This can be useful in web apps that load multiple items.</p>
<button class="show-progress-bar">Show Progress Bar</button>
<button class="load-one-item">Load An Item</button>
<button class="finish">Finish Loading</button>
</div>
<div>
<h1>Percentage Load</h1>
<p>NProgress lets you set the progress bar to a specific percentage. This can be useful in apps where you know the total number of the items to be loaded, so you can calculate the percentage. This is the technique that we will use in the demo.</p>
<button class="show-progress-bar">Show Progress Bar</button>
<button class="set-to-25">Set to 25% Loaded</button>
<button class="set-to-75">Set to 75% Loaded</button>
<button class="finish">Finish Loading</button>
</div>
The plugin github page suggests that you hook up the NProgress.start() function to your $(document).ready() callback and NProgress.done() to $(window).load()
which is a very easy way to integrate the plugin. This won’t show the
real progress (for that you will have to monitor all the resources that
are included in your page and increment the bar manually), however most
people won’t notice anyway.
Now that you have a good idea of how NProgress is used, let’s make a
more complicated example – a gallery that shows a progress bar while
loading images. The bar will correspond to the actual number of images
loaded.
The Gallery
As usual, we start off with the HTML markup. This time it is very
simple, we only have need a div to hold the photos, and a load button:
index.html
<!DOCTYPE html><html><head><metacharset="utf-8"/><title>Quick Tip: Add a Progress Bar to Your Site</title><linkhref="http://fonts.googleapis.com/css?family=PT+Sans+Narrow:700"rel="stylesheet" /><!-- The Stylesheets --><linkhref="assets/nprogress/nprogress.css"rel="stylesheet" /><linkhref="assets/css/style.css"rel="stylesheet" /></head><body><h1>Gallery Progress Bar</h1><divid="main"></div><ahref="#"id="loadMore">Load More</a><scriptsrc="http://cdnjs.cloudflare.com/ajax/libs/jquery/1.10.2/jquery.min.js"></script><scriptsrc="assets/nprogress/nprogress.js"></script><scriptsrc="assets/js/script.js"></script></body></html>
I am including a custom font from Google Webfonts and two stylesheets in the <head>, and three JavaScript files before the closing </body> tag.
Things get more interesting in the jQuery part of the tutorial. Here I am using the Deferred object
to show the photos consecutively. This is needed, because we want the
photos to download in parallel (which is much faster), but fade into
view one after the other. This article is too short to explain how
Deferreds work, but you can read through one of these: link, link, link. They are a powerful tool that can simplify asynchronous interactions.
assets/js/script.js
(function($){
// An array with photos to show on the page. Instead of hard // coding it, you can fetch this array from your server with AJAX.var photos = [
'assets/photos/1.jpg', 'assets/photos/2.jpg',
'assets/photos/3.jpg', 'assets/photos/4.jpg',
// more photos here
];
$(document).ready(function(){
// Define some variablesvar page = 0,
loaded = 0,
perpage = 10,
main = $('#main'),
expected = perpage,
loadMore = $('#loadMore');
// Listen for the image-loaded custom event
main.on('image-loaded', function(){
// When such an event occurs, advance the progress bar
loaded++;
// NProgress.set takes a number between 0 and 1
NProgress.set(loaded/expected);
if(page*perpage >= photos.length){
// If there are no more photos to show,// remove the load button from the page
loadMore.remove();
}
});
// When the load button is clicked, show 10 more images // (controlled by the perpage variable)
loadMore.click(function(e){
e.preventDefault();
loaded = 0;
expected = 0;
// We will pass a resolved deferred to the first image,// so that it is shown immediately.var deferred = $.Deferred().resolve();
// Get a slice of the photos array, and show the photos. Depending// on the size of the array, there may be less than perpage photos shown
$.each(photos.slice(page*perpage, page*perpage + perpage), function(){
// Pass the deferred returned by each invocation of showImage to // the next. This will make the images load one after the other:
deferred = main.showImage(this, deferred);
expected++;
});
// Start the progress bar animation
NProgress.start();
page++;
});
loadMore.click();
});
// Create a new jQuery plugin, which displays the image in the current element after// it has been loaded. The plugin takes two arguments:// * src - the URL of an image// * deferred - a jQuery deferred object, created by the previous call to showImage// // Returns a new deferred object that is resolved when the image is loaded.
$.fn.showImage = function(src, deferred){
var elem = $(this);
// The deferred that this function will returnvar result = $.Deferred();
// Create the photo div, which will host the imagevar holder = $('<div class="photo" />').appendTo(elem);
// Load the image in memoryvar img = $('<img>');
img.load(function(){
// The photo has been loaded! Use the .always() method of the deferred// to get notified when the previous image has been loaded. When this happens,// show the current one.
deferred.always(function(){
// Trigger a custom event on the #main div:
elem.trigger('image-loaded');
// Append the image to the page and reveal it with an animation
img.hide().appendTo(holder).delay(100).fadeIn('fast', function(){
// Resolve the returned deferred. This will notifiy// the next photo on the page and call its .always() callback
result.resolve()
});
});
});
img.attr('src', src);
// Return the deferred (it has not been resolved at this point)return result;
}
})(jQuery);
The progress bar is incremented with every loaded image by the callback function that listens for the image-loaded custom event. This way the showImage function is free to handle only the loading and displaying of the photos.
by Martin Angelov source: http://tutorialzine.com/2013/09/quick-tip-progress-bar/
Learn how to get started with HTML5 game development from this guide by Austin Hallock and Robert Nyman.
Most of the audience here already sees the value in HTML5, but I want
to re-iterate why you should be building an HTML5 game. If you are just
targeting iOS for your game, write the game in Objective-C, the cons
outweigh the benefits in that scenario… but if you want to build a game that works on a multitude of platforms, HTML5 is the way to go.
Cross-Platform
One of the more obvious advantages of HTML5 for games is that the
games will work on any modern device. Yes, you will have to put extra
thought into how your game will respond to various screen sizes and
input types, and yes, you might have to do a bit of ‘personalization’ in
the code per platform (the main inhibitor being audio); but it’s far
better than the alternative of completely porting the game each time.
I see too many games that don’t work on mobile and tablets, and in most instances that really is a huge mistake to make when developing your game – keep mobile in mind when developing your HTML5 game!
Unique Distribution
Most HTML5 games that have been developed to this point are built in
the same manner as Flash and native mobile games. To some extent this
makes sense, but what’s overlooked is the actual benefits The Web as a
platform adds. It’s like if an iOS developer were to build a game that
doesn’t take advantage of how touch is different from a mouse – or if
Doodle Jump was built with arrow keys at the bottom of the screen
instead of using the device’s accelerator.
It’s so easy to fall into the mindset of doing what has worked in the
past, but that stifles innovation. It’s a trap I’ve fallen into –
trying to 100% emulate what has been successful on iOS, Android, and
Flash – and it wasn’t until chatting with former Mozillian Rob Hawkes
before I fully realized it. While emulating what worked in the past is
necessary to an extent, The Open Web is a different vehicle for games,
and innovation can only happen when taking a risk and trying something
new.
Distribution for HTML5 games is often thought of as a weakness, but
that’s just because we’ve been looking at it in the same sense as native
mobile games, where a marketplace is the only way to
find games. With HTML5 games you have the incredible powerful hyperlink.
Links can so easily be distributed across the web and mobile devices
(think of how many links you click in the Facebook and Twitter apps),
and it certainly should not just be limited to the main page for the
game. The technology is there to be able to link to your game and do
more interesting things like jump to a specific point in a game, try to
beat a friend’s score, or play real-time against that friend – use it to
your advantage!
Take a good look at was has worked for the virality of websites and apply those same principles to your games.
Quicker Development Process
No waiting for compilation, updates and debugging in real-time, and
once the game is done, you can push out the update immediately.
Choosing a Game Engine
Game engines are just one more level of abstraction that take care of
a few of the more tedious tasks of game development. Most take care of
asset loading, input, physics, audio, sprite maps and animation, but
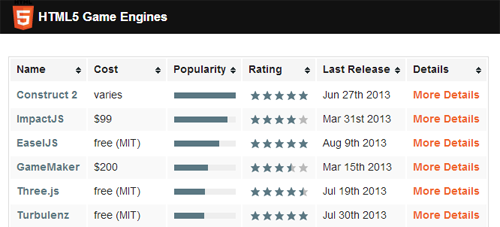
they vary quite a bit. Some engines are pretty barebones, while some (ImpactJS for example) go as far as including a 2D level editor and debug tools.
Decide Whether or Not You Need a Game Engine
This is largely a personal decision. Game Engines will almost always
reduce the time it takes for you to create a fully-functional game, but I
know some folks just like the process of building everything from the
ground up so they can better understand every component of the game.
For simple games, it really isn’t difficult to build from scratch
(assuming you have a JavaScript background and understand how games
work). Slime Volley (source)
for example was built without having a game engine, and none of the
components were rocket science. Of course, Slime Volley is a very basic
game, building an RPG from the ground up would likely lead to more hair
pulling.
Choosing Between a “Game Engine” and a “Game Maker”
Most of the typical audience of Mozilla Hacks are probably going to
lean toward using a game engine or building from scratch, but there is
also the alternative of using a “Game Maker” like Construct 2.
Using a Game Maker means you won’t actually write in JavaScript;
instead, you create code-like events in the editor. It’s a trade of
ease-of-use and quickness to prototype/develop vs customization and
control over the end result. I’ve seen some very impressive games built
with either, but as a developer-type, I tend to favor writing from
scratch / using an engine.
Finding the Right Game Engine / Game Maker for you
There are so many HTML5 game engines out there, which in part is a
good thing, but can also be a bad thing since a large percentage have
either already stopped being maintained, or will soon stop being
maintained. You definitely want to pick an engine that will continually
be updated and improved over the years to come.
HTML5GameEngine.com is a
great place to start your search because the hundreds of game engines
are narrowed down to about 20 that are established, actively maintained,
and have actual games being developed with them.
For a more complete list of engines (meaning there can be some junk to sift through), this list on GitHub is your best bet.
Learning Tools
If you’re going with a game engine, typically their site is the best resource with tutorials and documentation.
Technical Tutorials
jsGameWiki is full of links to technical tutorials and resources.
No Tears Guide to HTML5 Games is relatively old (2.5 years), but still is a very good learning tool if you’re not using a game engine.
Game Design Tutorials
With game development, the technical aspect isn’t everything – what’s more important is that the game actually be fun. Below are a few places to start when learning about game mechanics.
Full disclosure here: I am a co-founder at Clay.io.
Making a game function is just part of the equation. You also want
players to play longer, come back, tell their friends about it, and
maybe even buy something. Common elements in games that focus on these
areas are features like user accounts, high scores, achievements, social
integration, and in-game payments. On the surface most are typically
easy enough to implement, but there are often many cross-platform issues
and intricacies that are overlooked. There is also value in having a
central service running these across many games – for example, players
genuinely care about achievements on Xbox Live because Gamerscore
matters to them.
Clay.io – user accounts, high scores, achievements, in-game payments, analytics, distribution, and more.
CocoonJS – Improves HTML5 game performance on iOS and Android with an accelerated canvas bound to OpenGL ES.
Motivation
Regardless of what you’re building, extra motivation is always
helpful. For games, that motivation often comes from surrounding
yourself with others who are in the same boat as you – working on games.
js13kGames is a competition that is currently taking place at the
time of this writing. You have until September 13th, 2013 to develop an
HTML5 game that, when compressed, is less than 13kb.
Clay.io (full disclosure, I am a founder) runs an annual HTML5 game
development competition for students. Last year was the first year and
we had over 70 games submitted. The next competition is planned for February / March 2014.
One Game a Month isn’t so much a competition as it is an
accountability tool. This isn’t restricted to HTML5 games, but many of
the participants work with HTML5. The goal is to crank out one game
every month. I wouldn’t recommend this long-term since one month is too
short of a time to create a great game, but it’s good when learning to force yourself to develop and finish simple games.
HTML5GameDevs has quickly become the most active community of HTML5
game developers. Most folks are very friendly and willing to help with
any issues you run into.
#BBG is the go-to IRC channel for HTML5 games – you’ll even find quite a few Mozillians hanging around.
How to Make Money
In-Game Purchases
In-game payments, in my opinion, are the way to go for HTML5 game in the long-term. For now, most HTML5 games don’t have enough quality content, nor the game mechanics in place to get player purchasing items.
This is the revenue model with the highest potential, but it’s also
the most difficult to achieve by far – not technically, but having the
right game. I’d say the best way to learn how to properly monetize your
game in this aspect is to take a look at games that do it really well on
Flash and Mobile – games from King.com and Zynga typically have this
nailed down pretty well. There’s also some good reading material, like The Top F2P Monetization Tricks on Gamasutra.
Licensing
Where we’re at right now with HTML5 games, licensing games is the
strongest, most consistent way to make money – if and only if your game
works well on mobile devices.
There are countless “Flash Game Portals” that receive organic mobile
traffic, but can’t monetize it with the Flash games they have. Their
solution is to go out and find HTML5 games to buy non-exclusive licenses
(the right to put the game on their site, often making small
adjustments) to offer their mobile visitors.
Typically non-exclusive HTML5 game licenses (meaning you can sell to
more than one site) go for $500-$1,000 depending on the game and
publisher. Some publishers will do a revenue share model instead where
you’ll get a 40-50% share on any advertising revenue, but no up-front
money. Licensing is the safest way to make money right now, but the cap is limited
– the most you’re going to make with a single game is in the
$5,000-$6,000 range, but it is easier to hit that mark than it is with
in-game payments or advertising.
Advertising
Advertising is the middle-ground between in-game payments and
licensing. It’s easier than in-game payments to make money and with a
higher potential cap than licensing (but probably less than in-game
payments). It’s easy enough to implement ads: just pick your ad network
of choice (be wary of Adsense’s strict terms) and implement them either
surrounding the game, or at various stopping points.
The commonly used ad networks are LeadBolt for mobile and CPMStar for desktop. You can also use Clay.io
which makes it a bit easier to implement advertising, and tries to
maximize the revenue by using different ad networks depending on the
device used and other factors.
Distribution
The final stage in a game’s development is distribution. The game is
done, now you want people playing the game! Fortunately, with HTML5
there are plenty of places to have your game (many of which often go
unused).
More and more marketplaces these days are accepting HTML5 games
as-is. Each has their own requirements (Facebook requires SSL, most
require a differently formatted manifest file, etc…), but the time it
takes to get into each is typically less than 30 minutes. If you want to
reduce that even more, Clay.io helps auto-generate the manifest files
and promotional image assets you’ll need (as well as takes care of the
SSL requirement) – documentation on that here.
Some marketplaces you’ll need to have a native wrapper for your game –
primarily the iOS App Store and Google Play. A wrapper like PhoneGap is
one option, but the native webviews have pretty terrible JavaScript
engines, so for now you’re better off with tools like CocoonJS and Ejecta.
source: https://hacks.mozilla.org/2013/09/getting-started-with-html5-game-development/
The icon set is licensed under a Creative Commons Attribution 3.0 Unported License. However, don’t redistribute the icon set as-is (without prior consent of the author).
Here are all the different formats (as ZIP file) for you to download:
A set of 12 pixel-perfect landmark icons in AI, PSD and EPS format.
It’s a set of 12 famous landmark icons and it was created by talented Shaun Dona.
It contains a set of famous landmarks from around the word and each
icon was carefully crafted. The set comes in three different formats
(AI, EPS, PSD) plus Adobe Illustrator CS1.
About the Icon Set
The Famous Landmarks Icon Set…
includes a set of 12 pixel-perfect and creative landmarks with a creative design.
has all icons as vector shapes so that you can resize them without making them pixelated.
This lovingly honed set, of 200 vector icons
is fantastic for use on all manner of sites. With subjects ranging from
science to entertaining, the vast scope of the icons means that you’re
bound to find something useful.
There are some really charming details that you don’t often find in
free icon sets: there’s a lovely wiggle on the cord of the phone; the
leaves of the cigar really bring out its shape; the hand-crank sewing
machine looks just like a vintage Singer; and the guy in the shower
looks like he’s having a great time.
The icons are provided by FreeVector.com where
you can find over 11,000 files. From vector graphics to logos, icons,
wallpapers and fonts. The site also features user submitted content,
posts news from the vector world and is updated daily.
The set below includes 200 vector shapes, meaning you can blow them
up as much as you like and they’ll stay sharp. Each file includes AI,
EPS, PSD and JPG files. They’re good for use on both personal and
professional projects. Download information is located after the
previews below…
Many front-end developers possess the creative and technical skills
that clients are looking for, but don’t get noticed because they don’t
have much exposure or reputation to demonstrate to potential clients.
Some carry the idea that their area of work is in such high demand that
clients will simply come to them – but this is rarely the case.
A great way to get your name out there, build a reputation, and
accumulate a list of clients is to market your specific skills. This is
not only an excellent technique for freelancers, but it could also be
what sets you apart from competition fighting for a particular job. As a
developer, you may not know where to even begin in the process of
marketing yourself. Follow these tips to increase your chances of
attracting clients by effectively portraying your strengths.
1. Find Your Niche
It’s tempting to spread yourself thin and learn a little bit of
everything so you can say that you can do it all, but you’ll benefit
more by becoming an expert in one niche (you can’t be everything to
everyone, after all). Narrow your interests or skills to something like
ecommerce, blog, or mobile app design. Become an expert by learning the
ins and outs of that area, and then working and experimenting with it.
You’ll begin to build the groundwork of a good portfolio, and it will
make reaching potential clients a less daunting endeavor. Your
leadership in a specific field will increase your demand, leading to a
flow of work that allows you to choose the best projects for you.
2. Get Published
As a way to help establish your expertise, consider writing an
article or case study about your niche skill set. You can start by
posting helpful articles on your blog or website to interest readers,
and then start submitting longer pieces to other reputable sites like SmashingMagazine or e-book publishing networks. Even publishing a book as HTML on your site, like Addy Osmani does,
can do wonders for your reputation. The community awards valuable
resources with its full attention. This can result in invitations for
speaking at conferences, networking with other community members and
consultancy work.
3. Participate In Online Communities
You can also build your reputation by investing in communities like Stackoverflow and Quora.
Not only does it allow you to connect with other developers, but it
also publicly showcases your ability to solve problems. And through open
source software platforms like Github,
you can publish your projects and invite a host of other community
collaborators. Having a strong foundation within these communities can
be invaluable when communicating your expertise and building your
network.
4. Create A Microsite
Single page websites are the perfect platform to show off your
skills. Especially if you design one that focuses on a not-for-profit
purpose that is creative, beautifully designed and contains interesting
content. These are the sites that are more likely to be shared by users,
which is a great way of getting free and quick exposure. Don’t be
afraid to go crazy with features like parallax scrolling, unconventional
grids and sliding effects to adequately showcase your abilities. On the
flip side though, while it’s important to showcase the breadth of your
skills, often time’s simple pages, like this iPod visualization or this one, can
go a long way. This is a great way to let potential clients (or your
interviewer) not simply look at, but interact with something you’ve
created.
This home security guide
for SimpliSafe, chock full of creativity and quality content, is a
great example of a project that you can have people interact with. This
one takes the user through the process of securing a home, enhanced with
a clever comparison to a castle defense system and imaginative parallax
scrolling.
5. Develop An Online Tool
If you’ve ever found yourself wishing there was a tool to serve a
specific purpose to aid you in your work, consider making one yourself.
Patrons will surely be amazed by the fact that you have developed a tool
or app that other developers use. Sometimes the simplest concepts can
be the most helpful, so simplify your ideas to make them look
effortless. CodePen is an
example of how online tools can be immensely helpful to front-end
developers. Use this in-browser code editor as inspiration for the tools
you create.
6. Create Free Resources or Plugins
Another effective direction to gear your personal projects is to
create free, downloadable resources for developers through the web.
Consider enabling users to give feedback on their performance, so you
can show clients that you’re dedicated to following through and
improving on your projects. You can even submit them to sites like Design Instruct to gain more published exposure. This UI designer created a Sketching and Wireframing Kit
to provide a convenient and useful resource for UI and wireframing
elements to his readers. Easily accessed right from his website, he
offers multiple download formats and an opportunity for user feedback.
7. Use Social Networking
Social networking is arguably the most efficient means of free
advertising. Since it’s fueled by users and their online word-of-mouth,
your name and work can easily spread, which is why this is a marketing
strategy worth your time. You can use sites like Facebook, Twitter and
Pinterest to contribute high quality posts to the public, and link them
back to your blog, which should narrow its content to further fit your
niche audience. Internet users and clients will likely expect you to
have accounts on all these networking sites, but make it easier for them
to check them out through social media links on your blog and/or
website, writing pieces and all other marketing elements you create.
8. Connect All Your Work
By linking all of your work and media sites to each other and keeping
all your content consistent, you transform yourself from a freelancer
(or job applicant) to a brand, which is much easier to market. You’ll
build a following of readers and clients that can give feedback and
recommendations to others, while your client base continues to grow. The
work that you have developed to show to potential clients will put you
that much further ahead of your competition, and you can anticipate the
demand for your work to multiply. So instead of waiting for clients to
come to you, use these assertive strategies to reveal your skills.
If you have searched images on Google recently, you might have
noticed the interesting expanding preview for a larger image when you
click on a thumbnail. It’s a really nice effect and it is very
practical, making a search much easier. Today we want to show you how to
create a similar effect on a thumbnail grid. The idea is to open a
preview when clicking on a thumbnail and to show a larger image and some
other content like a title, a description and a link.
The interesting part is to calculate the correct preview height and
to scroll the page to the right position. We’ll expand the preview in a
way so that we can see the respective thumbnail row and cover the rest
of the remaining page. Note that we don’t use very large images for the
preview in the demo so you might see a lot of empty space on large
monitors.
The demo features some amazing artwork by Jaime Martinez.
Simple overlay instructions for your apps with chardin.js
Chardin.js is a jQuery plugin that creates a simple overlay to display instructions on existent elements. It is inspired by
the recent Gmail new composer tour which I loved.
This is what we were all waiting for! Finally a CSS converter that
will expand your CSS to the maximum! Watch your line numbers and
properties grow as you fess up your stylesheet ;) A fun project by Dew.
Is the CSS syntax way too simple for you ? Do you think preprocessors are for losers ? Are you paid per line of code ? Do you need big stylesheets ? FESS your CSS and get more code from your source !
FESS uses an exclusive secret algorithm for a styled experience
Portraits has a beautiful, clean and flat design brought to the next
level. Subtle effects and a great color scheme make it our pick this
week.
1. choose your best photo to use as the base for your works of art!
2. Give your piece of work a little personality with color, texture and a caption.
3. Share your unique portrait with friends and family online, or get a high-quality print made!
Cameron Lakenen from Crocodoc explains how they use SVG to do some fancy 3D effects when converting documents.
Note: the demos in this blog post require IE 9+ (preferably 10),
Firefox, or any WebKit browser. If you’re on a mobile device, you might
need to click the open in new page button to view the demos properly.
This resource features 12 grunge stamped style vector borders. The
download includes AI and EPS vector files, as well as, PS brushes and
vector shapes. A bonus 8 worn paper textures are included for use with
the stamp shapes.





 RSS Feed
 Twitter
 Facebook